
What is MUD? How do you use it?
MUD is a glass based Texture Medium that can air dry to a rock hard state and can also be kiln fired alone or right along with our NT and Artisan Color lines. MUD comes in two colors, White and Black. We introduced White MUD to our product line in 2009 and then added Black MUD in 2010. Both colors are very opaque. They are ready to use right out of the jar with no further preparation whether they will be kiln fired or air dried. Product tends to settle in jar. Use UGC Medium IF the MUD needs to be thinned for any reason.
Application - MUD can be applied with a brush, a palette knife, a popsicle stick, your fingers or whatever way you can imagine. There are a multitude of application options and we will show some of them in the Sample Photos with explanations.
You can tint the White MUD using our NT Colors but note that you will only ever get a pastel color since the White is so opaque. We like to do the design/project in White, let dry for 24 hours and then add color on top. There are examples of this in the Sample Photos.
MUD is thicker than our Outline Black and Outline White so can be used for outlining or drawing techniques where you want some texture and height. We have some customers who like to mix Black MUD and Outline Black 1:1 for outlining. The two products are compatible.
Firing range is the same as our color lines - 1425F to 1550F - note that the hotter they are fired the shinier they become.
Examples of MUD Projects
-

This is a purchased glass tile from a home improvement store. MUD design applied, then re-fired to 1435F to make the MUD permanent but not affect the edges of the tile.
-
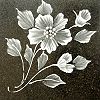
This is a purchased granite tile from a home improvement store. MUD design applied, then re-fired to 1435F to make the MUD permanent but not affect the tile since it is stone. The tile loses a bit of the shine but it is meant as an accent tile.
-
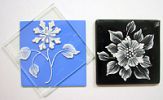
Make your own glass tiles! Two pieces of float glass - Apply UGC color to the bottom piece, your MUD design to the top piece then fuse together - sample was fired at 1500F. Colors shown are NT 1956 Dark Blue (tile on the left - not fired) and 1969 Gloss Black (tile on the right).
-
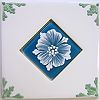
White inset tile purchased from a home improvement store. MUD mixed with NT 1961 Dark Green, placed in pastry bag with writing tip and design added to tile. Inset created as above. Fire separately to 1500F and glue both to a piece of netting for ease of installation.
-
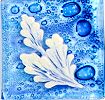
Again, two pieces of float glass. This time Artisan 603 Royal Blue was applied thinly and used on the bottom piece of glass. MUD design on top and fused at 1500F.
-
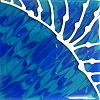
Two pieces of float glass. On bottom piece drop in two NT colors - 1956 Dark Blue and 1958 Turquoise used in the sample - then use the very tip of the 10/0 liner or a toothpick to drag a design into the wet color. Apply design of choice on top piece and fire to 1500F. Great way to create custom tiles.
-

Two pieces of float glass. On bottom piece apply a layer of UGC Medium. Sift dry NT colors over the wet UGC Medium - NT Colors 1997 Leaf Green and 11021 Purple used in the sample - MUD design on top, fire at 1500F.
-
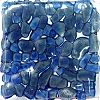
Two pieces of float glass, tempered frit pieces, tweezers, waxed paper, White MUD and NT 1956 Dark Blue. Prepare colored frit; in a container mix Dark Blue to the consistency of melted ice cream using UGC Medium. Add pieces of tempered frit, stir to coat and then dump it all out onto the waxed paper. Allow to dry, stirring every so often to separate. When dry set aside. Make another container the same way but do not put it out to dry. Set aside. Take one piece of glass and butter it with a medium layer of MUD, you want it just thick enough to be able to push pieces of frit into it but not ooze over the top of the frit. Using the tweezers begin to place pieces of the dried frit pieces onto the wet MUD. Be random but do not cover the whole surface. Then place the wet pieces of frit in the remaining areas. Allow all to dry thoroughly (24 hours is best) and place the second piece of glass over the top and fire to 1500F. The frit that is more blue is the dried pieces and the darker frit is the wet application.
-
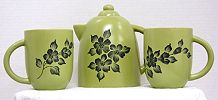
Black MUD on purchased stoneware tea set, design applied with the pastry bag and Margot s Miracle Brush and then fired to 1425F.
-
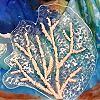
Fan coral was created by first mixing fine frit with White MUD, forming into spines, place on surface and allowing to dry thoroughly. Outline White was used to outline the fan shape and then White MUD was stippled around the dried spines and again, allowed to dry. 1999 Coral was then applied thinly over all the MUDDED areas and fired along with the rest of the design to 1500F.
-
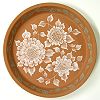
Floral design on purchased terra cotta applied with pastry bag and Margot's Miracle Brush. Trim around inside edge shows White MUD tinted with 1961 Dark Green. Fired to 1485F
-
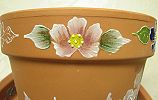
This shows the White MUD tinted with NT colors. Allow design to dry, coat area (leaf, petal) with a thin layer of UGC Medium, tuck just a bit of NT liquefied color at the base of the petal or leaf, wipe brush and pull color out. Allow to dry and fire to 1485F
-
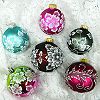
Air dried application is perfect for ornaments, eggs or decorating most any surface. White MUD applied with pastry bag and Margot's Miracle Brush.
-

Faux Wood Carving - air dried application. Apply design to sealed raw wood or over cleaned finished surface. Allow to dry. Paint over all solidly. It can then be varnished or can be antiqued and then varnished. Metal leafing could also be applied over surface.
-
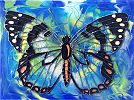
Here the Black MUD has been used to outline the design with the pastry bag and then NT Colors were used for the background and to fill in the butterfly markings. Two layers, fired to 1500F.
-

White MUD was used in the pastry bag to create tree bark, allowed to dry thoroughly and then 1966 Warm Brown and 1967 Dark Brown were used to color the dried MUD. Two layers, fired to 1500F.
